
Search Results
-
 Brooks Grey Desk With A Custom Glaze
Amy Howard At Home Contributor, Leah Kendrick, painted this beautiful Brooks Grey Desk. Read along as she explains her process. Step 1 - Sand Leah started by sanding down the top with several grits of sandpaper to bare wood. Step 2 - Clean Slate Then she cleaned the body with Clean Slate to prep. Step 3 - Gel Stain Next, use 3 light coats of English Walnut Gel Stain applying it with a foam brush. Let dry thoroughly before each coat. Step 4 - One Step Paint Leah then applied 2 coats Brook...
Brooks Grey Desk With A Custom Glaze
Amy Howard At Home Contributor, Leah Kendrick, painted this beautiful Brooks Grey Desk. Read along as she explains her process. Step 1 - Sand Leah started by sanding down the top with several grits of sandpaper to bare wood. Step 2 - Clean Slate Then she cleaned the body with Clean Slate to prep. Step 3 - Gel Stain Next, use 3 light coats of English Walnut Gel Stain applying it with a foam brush. Let dry thoroughly before each coat. Step 4 - One Step Paint Leah then applied 2 coats Brook...
-
 The Perfect Grey Color...
We are color crushing on Scandinavian Grey Milk Paint this week...the perfect grey color! Watch as Amy shows you how you can transform this color using Cracked Gesso, Antiquing Glaze, and Light and Dark waxes. She also goes through great tips on mixing your Milk Paints, the consistency, and more... Scroll down to shop the products used in this video! Shop the products used below... Scandinavian Grey Milk Paint Cracked Gesso Antiquing Glaze Light Wax Dark Wax
The Perfect Grey Color...
We are color crushing on Scandinavian Grey Milk Paint this week...the perfect grey color! Watch as Amy shows you how you can transform this color using Cracked Gesso, Antiquing Glaze, and Light and Dark waxes. She also goes through great tips on mixing your Milk Paints, the consistency, and more... Scroll down to shop the products used in this video! Shop the products used below... Scandinavian Grey Milk Paint Cracked Gesso Antiquing Glaze Light Wax Dark Wax
-
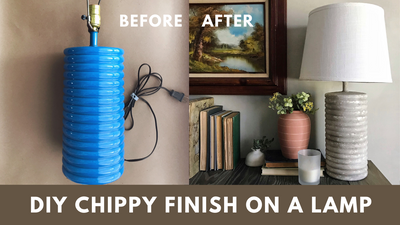 DIY Chippy Finish Lamp
Ever wanted to add the perfect piece of antique decor to your home, but didn’t know where to start? In this week’s tutorial, we’re going to show you how to EASILY DIY your very own Chippy Finish Lamp using one we found laying around! The results are breathtaking and yet so simple to achieve for any DIY enthusiast. No matter if this is your first home decor refinish project or your thousandth, you are sure to enjoy taking an average lamp and turning it into an extraordinary piece of antiqu...
DIY Chippy Finish Lamp
Ever wanted to add the perfect piece of antique decor to your home, but didn’t know where to start? In this week’s tutorial, we’re going to show you how to EASILY DIY your very own Chippy Finish Lamp using one we found laying around! The results are breathtaking and yet so simple to achieve for any DIY enthusiast. No matter if this is your first home decor refinish project or your thousandth, you are sure to enjoy taking an average lamp and turning it into an extraordinary piece of antiqu...
-
 DIY Abstract Napkin Holder | Using One Step Paint
Create a unique napkin holder as a housewarming gift or to have a little something new in your kitchen. Supplies - click below to shop: Napkin Holder Clean Slate Holey Moley - One Step Paint Brooks Grey - One Step Paint Palmer Pink - One Step Paint Massey Hill - One Step Paint 1.5” Round Tapered Brush Painters’ Tape Lint Free Cloth Instructions: Begin by cleaning the napkin holder using a lint-free cloth and Clean Slate. Next, place a piece of Painters’ Tape vertically to section off...
DIY Abstract Napkin Holder | Using One Step Paint
Create a unique napkin holder as a housewarming gift or to have a little something new in your kitchen. Supplies - click below to shop: Napkin Holder Clean Slate Holey Moley - One Step Paint Brooks Grey - One Step Paint Palmer Pink - One Step Paint Massey Hill - One Step Paint 1.5” Round Tapered Brush Painters’ Tape Lint Free Cloth Instructions: Begin by cleaning the napkin holder using a lint-free cloth and Clean Slate. Next, place a piece of Painters’ Tape vertically to section off...
-
 Create a Gorgeous Marble Look With Glazed Over & One Step Paint™
Marble is a gorgeous stone that exudes classical elegance, but it can cost a fortune. Marbleizing is a skillful technique you can use to create a faux marble finish that takes any piece to the next level. You can do marbleize a variety of surfaces, like ceramic tile, Formica countertops, kitchen cabinets, backsplash wood, linoleum, and more. To get a classic, chic, faux-Carrara marble effect in your own home or for your furniture refinishing project, follow this week’s Finish Friday video. In...
Create a Gorgeous Marble Look With Glazed Over & One Step Paint™
Marble is a gorgeous stone that exudes classical elegance, but it can cost a fortune. Marbleizing is a skillful technique you can use to create a faux marble finish that takes any piece to the next level. You can do marbleize a variety of surfaces, like ceramic tile, Formica countertops, kitchen cabinets, backsplash wood, linoleum, and more. To get a classic, chic, faux-Carrara marble effect in your own home or for your furniture refinishing project, follow this week’s Finish Friday video. In...
-
 Step By Step: Antique Your Painted Piece
Gene is here today to show you how to antique a painted piece today! He used our Color Crush this week, Luxe Grey, on this piece. Watch as he takes you step by step through the antiquing process! Shop the products used: Luxe Grey One Step Paint Light Wax Dark Wax Dust of Ages Brushes Follow Along... 1. Clean your piece with Clean Slate, let it dry for 20 minutes. 2. Choose your color of One Step Paint and paint your piece. Apply thin coats of the paint for full coverage. Gene is using our Co...
Step By Step: Antique Your Painted Piece
Gene is here today to show you how to antique a painted piece today! He used our Color Crush this week, Luxe Grey, on this piece. Watch as he takes you step by step through the antiquing process! Shop the products used: Luxe Grey One Step Paint Light Wax Dark Wax Dust of Ages Brushes Follow Along... 1. Clean your piece with Clean Slate, let it dry for 20 minutes. 2. Choose your color of One Step Paint and paint your piece. Apply thin coats of the paint for full coverage. Gene is using our Co...
-
 A Black Piece Of Furniture Anchors Every Room
This week we are crushing on BLACK. Black provides the visual anchor that every room needs. Amy shows you what colors work well with black and how to take our Black One Step Paint to the next level. Shop Black One Step Paint here. Complimentary Shades Of One Step Paint: Luxe Grey - a beautiful light gray with a hint of blue. Graphite - a deep gray color that compliments black perfectly. Change the look of our Black One Step Paint with the following: Cerusing Wax - add Cerusing Wax for a b...
A Black Piece Of Furniture Anchors Every Room
This week we are crushing on BLACK. Black provides the visual anchor that every room needs. Amy shows you what colors work well with black and how to take our Black One Step Paint to the next level. Shop Black One Step Paint here. Complimentary Shades Of One Step Paint: Luxe Grey - a beautiful light gray with a hint of blue. Graphite - a deep gray color that compliments black perfectly. Change the look of our Black One Step Paint with the following: Cerusing Wax - add Cerusing Wax for a b...
-
 How To: Cracked Gesso End Tables With A Custom Wax
Amy Howard At Home Contributor, Leah, is giving you all the details on how she created these gorgeous Cracked Gesso End Tables. She also shows you how to create a custom wax that will add age to your piece. Step 1 - Clean: Clean well with Clean Slate Step 2 - Base Coat: One coat of Bauhaus Buff One Step Paint (to give Cracked Gesso something to adhere to) Step 3 - Mix It Up: Mix up your Cracked Gesso, 1 Part Gesso to 1 Part Water. Mix well and let sit in the fridge overnight. ...
How To: Cracked Gesso End Tables With A Custom Wax
Amy Howard At Home Contributor, Leah, is giving you all the details on how she created these gorgeous Cracked Gesso End Tables. She also shows you how to create a custom wax that will add age to your piece. Step 1 - Clean: Clean well with Clean Slate Step 2 - Base Coat: One coat of Bauhaus Buff One Step Paint (to give Cracked Gesso something to adhere to) Step 3 - Mix It Up: Mix up your Cracked Gesso, 1 Part Gesso to 1 Part Water. Mix well and let sit in the fridge overnight. ...
-
 Patio Furniture Makeover | Using Our High Performance Lacquer
Amy Howard At Home Contributor, Heidi Marsh, is going to show you how to use lacquer to give your patio furniture a new lease on life! She calls this Bistro set Rosemary... Supplies - Click Below To Shop: Clean Slate Bright Idea Vendome Grey Lacquer Pink Lacquer Lacquer Primer Step 1 - Clean: Clean with Clean Slate. Set up a spray area outside, blocking off areas of wind with cardboard boxes or tarps if needed. Step 2 – Prep: Paint a base later of Furniture Lacquer Primer. Let dry. After ...
Patio Furniture Makeover | Using Our High Performance Lacquer
Amy Howard At Home Contributor, Heidi Marsh, is going to show you how to use lacquer to give your patio furniture a new lease on life! She calls this Bistro set Rosemary... Supplies - Click Below To Shop: Clean Slate Bright Idea Vendome Grey Lacquer Pink Lacquer Lacquer Primer Step 1 - Clean: Clean with Clean Slate. Set up a spray area outside, blocking off areas of wind with cardboard boxes or tarps if needed. Step 2 – Prep: Paint a base later of Furniture Lacquer Primer. Let dry. After ...
-
 KITCHEN MAKEOVER: BEFORE AND AFTER
KITCHEN CABINETS Every project deserves a fresh start. With a clean lint-free rag and the Amy Howard at Home© Clean Slate™ solution in hand, gently wipe away the dust, dirt and grime collected from years of use.To ensure optimal performance, thoroughly shake your Amy Howard at Home© One Step Paint™ for at least 1-2 minutes before opening. Follow by stirring with a clean wooden stir stick until all ingredients are mixed to an even creamy texture. Pro Tip: The Amy Howard at Home One Step Pa...
KITCHEN MAKEOVER: BEFORE AND AFTER
KITCHEN CABINETS Every project deserves a fresh start. With a clean lint-free rag and the Amy Howard at Home© Clean Slate™ solution in hand, gently wipe away the dust, dirt and grime collected from years of use.To ensure optimal performance, thoroughly shake your Amy Howard at Home© One Step Paint™ for at least 1-2 minutes before opening. Follow by stirring with a clean wooden stir stick until all ingredients are mixed to an even creamy texture. Pro Tip: The Amy Howard at Home One Step Pa...
-
 Top 8 One Step Paint™ Colors
Here at Amy Howard at Home, we pride ourselves on creating top-notch products that are versatile, easy to use, and safe. Of course, one of our all-time best-selling products is our line of One Step Paint™. One Step Paint can transform furniture and décor with the stroke of a brush. Your favorite pieces can be rescued and restored to a beautifully aged finish. With One Step Paint™, you can achieve that rich, chalky finish you love without sanding, priming, or stripping. This water-based, ri...
Top 8 One Step Paint™ Colors
Here at Amy Howard at Home, we pride ourselves on creating top-notch products that are versatile, easy to use, and safe. Of course, one of our all-time best-selling products is our line of One Step Paint™. One Step Paint can transform furniture and décor with the stroke of a brush. Your favorite pieces can be rescued and restored to a beautifully aged finish. With One Step Paint™, you can achieve that rich, chalky finish you love without sanding, priming, or stripping. This water-based, ri...
-
 Give Your Piece Old World Age With Cracked Patina
When it comes to creating authentically “Old World” pieces, nothing beats Amy Howard at Home’s Cracked Patina™. Not only does it allow you to create depth and texture without a ton of sanding, buffing, or painting techniques, but it’s easy to use with Amy Howard at Home One Step Paint. How Cracked Patina and One Step Paint Work Together One Step is water-based, chalk-based, VOC-free, and green certified. This removes the need to sand, strip, or prime your piece — and leaves a perfect base...
Give Your Piece Old World Age With Cracked Patina
When it comes to creating authentically “Old World” pieces, nothing beats Amy Howard at Home’s Cracked Patina™. Not only does it allow you to create depth and texture without a ton of sanding, buffing, or painting techniques, but it’s easy to use with Amy Howard at Home One Step Paint. How Cracked Patina and One Step Paint Work Together One Step is water-based, chalk-based, VOC-free, and green certified. This removes the need to sand, strip, or prime your piece — and leaves a perfect base...
-
 HOW TO GET THE CERUSED, OR LIMED WAX FINISH
CERUSED AND LIMED FINISH I want to tell you about a furniture finish that I absolutely love. It’s been around for quite a long time, and, although it has fallen in and out of favor over the centuries, it is recently making a comeback! I’m talking about this fabulous cerused, or limed, finish. With a very understated and elegant look, the cerused finish delightfully agrees with so many different decorating styles. Whether your style is anything from modern to rustic, this finish will mak...
HOW TO GET THE CERUSED, OR LIMED WAX FINISH
CERUSED AND LIMED FINISH I want to tell you about a furniture finish that I absolutely love. It’s been around for quite a long time, and, although it has fallen in and out of favor over the centuries, it is recently making a comeback! I’m talking about this fabulous cerused, or limed, finish. With a very understated and elegant look, the cerused finish delightfully agrees with so many different decorating styles. Whether your style is anything from modern to rustic, this finish will mak...
-
 PAINTED CHAIR AND FABRIC CUSHION
For this project we used: Amy Howard at Home® One Step Paint™ in Luxe Grey Amy Howard at Home® One Step Paint™ in Metropolitan Grey Amy Howard at Home® Clean Slate™ Clean lint-free rags Amy Howard at Home® Round Hog Hair Brushes Amy Howard at Home ® Adhesive Stencil – Ikat Amy Howard at Home ® Mind your own Beeswax (2) Cardboard Pallets 1000 Grit Sandpaper 400 Grit Sandpaper Water for diluting STEP 1: Clean the wood on the chair with Amy Howard at Home® Clean Slate™ and a clean lint-fre...
PAINTED CHAIR AND FABRIC CUSHION
For this project we used: Amy Howard at Home® One Step Paint™ in Luxe Grey Amy Howard at Home® One Step Paint™ in Metropolitan Grey Amy Howard at Home® Clean Slate™ Clean lint-free rags Amy Howard at Home® Round Hog Hair Brushes Amy Howard at Home ® Adhesive Stencil – Ikat Amy Howard at Home ® Mind your own Beeswax (2) Cardboard Pallets 1000 Grit Sandpaper 400 Grit Sandpaper Water for diluting STEP 1: Clean the wood on the chair with Amy Howard at Home® Clean Slate™ and a clean lint-fre...
-
 DIY Shabby Shutters Using Layered Milk Paints
Picked up some shutters from a rummage sale? AHAH Contributor, REVIVE by Heidi, is here to show you how to transform them! She calls these shutters, Ava and Ella. Step 1 - Clean Clean with Clean Slate Step 2 - Base Color Paint a base layer of Credenza One Step Paint. After drying, I added one more coat. Be sure to lightly sand with 400 grit sandpaper between coats for an extra smooth finish. Step 3 - Add Texture Apply two coats of Cracked Gesso with a natural bristle chip brush. Be s...
DIY Shabby Shutters Using Layered Milk Paints
Picked up some shutters from a rummage sale? AHAH Contributor, REVIVE by Heidi, is here to show you how to transform them! She calls these shutters, Ava and Ella. Step 1 - Clean Clean with Clean Slate Step 2 - Base Color Paint a base layer of Credenza One Step Paint. After drying, I added one more coat. Be sure to lightly sand with 400 grit sandpaper between coats for an extra smooth finish. Step 3 - Add Texture Apply two coats of Cracked Gesso with a natural bristle chip brush. Be s...
-
 Chippy, Old World Half Moon Table
AHAH Contributor, Heidi, is showing you how to achieve a beautiful, chippy, old world finish today. She calls this piece, Celine. Shop this blog post by clicking on the bolded products! Step 1 - Clean: Clean with Clean Slate and sand out any imperfections where stain will be applied. Step 2 - Stain: Apply English Walnut Gel Stain with a natural bristle brush to top. Step 3 – Add Texture: Apply two coats of Cracked Gesso with a natural bristle chip brush. Be sure to allow each coat to dry bef...
Chippy, Old World Half Moon Table
AHAH Contributor, Heidi, is showing you how to achieve a beautiful, chippy, old world finish today. She calls this piece, Celine. Shop this blog post by clicking on the bolded products! Step 1 - Clean: Clean with Clean Slate and sand out any imperfections where stain will be applied. Step 2 - Stain: Apply English Walnut Gel Stain with a natural bristle brush to top. Step 3 – Add Texture: Apply two coats of Cracked Gesso with a natural bristle chip brush. Be sure to allow each coat to dry bef...


